
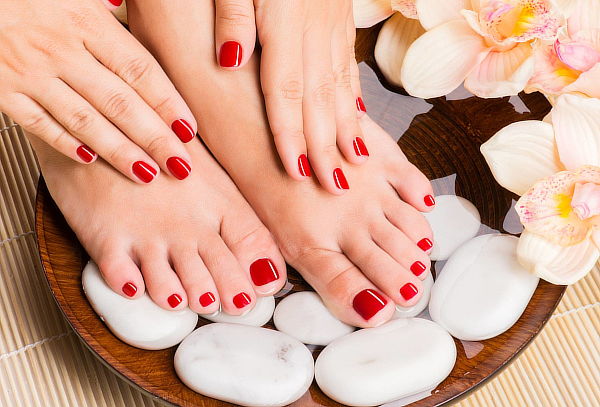
Getting a pedicure at a salon can be a relaxing and pampering experience, but it can also be quite pricey. Luckily, with the right tools and techniques, you can give yourself a professional-looking pedicure at home for a fraction of the cost. Follow these step-by-step instructions to achieve beautiful, salon-quality results without ever leaving the comfort of your own home.
The best pedicure in Scottsdale offer a luxurious and relaxing escape from the hustle and bustle of everyday life. Whether you are treating yourself to a solo pampering session or enjoying a spa day with friends, these establishments provide the perfect setting for you to unwind and recharge. With top-notch service, high-quality products, and a serene atmosphere, the best pedicure in Scottsdale is a treat for your feet and your soul.
Step 1: Gather Your Supplies
Before you begin your at-home pedicure, make sure you have all the necessary supplies on hand. Here's what you'll need:
- Nail polish remover
- Cotton balls
- Nail clippers
- Nail file
- Cuticle pusher
- Cuticle trimmer
- Foot scrub
- Pumice stone or foot file
- Moisturizing lotion
- Base coat
- Nail polish
- Top coat
Step 2: Remove Old Nail Polish
Start by using a cotton ball soaked in nail polish remover to remove any old nail polish from your toenails. Make sure to thoroughly clean each nail to ensure a clean base for your new pedicure.
Step 3: Soak Your Feet
Fill a basin with warm water and add a few drops of your favorite foot soak or Epsom salts. Soak your feet for 10-15 minutes to soften your skin and relax your muscles. This will make it easier to remove dead skin and calluses later on.
Step 4: Trim and Shape Your Nails
Once your feet are done soaking, it's time to trim and shape your nails. Use nail clippers to trim your nails to your desired length, and then use a nail file to shape them. Make sure to file in one direction to prevent splitting or breakage.
Pro Tip:
For a clean and professional look, shape your nails straight across and slightly rounded at the corners. This helps prevent ingrown toenails.
Step 5: Care for Your Cuticles
Push back your cuticles using a cuticle pusher, and then trim any excess skin with a cuticle trimmer. Be gentle and careful to avoid cutting yourself. Pushing back and trimming your cuticles helps create a clean and polished look for your pedicure.
Step 6: Exfoliate and Remove Dead Skin
Apply a foot scrub to your feet and use a pumice stone or foot file to gently exfoliate and remove dead skin and calluses. Focus on rough areas like heels and the balls of your feet. Rinse your feet and pat them dry when you're finished.
Step 7: Moisturize Your Feet
Apply a generous amount of moisturizing lotion to your feet and massage it in thoroughly. Pay extra attention to dry areas and massage your feet to promote circulation and relaxation. Your feet will feel soft, smooth, and rejuvenated after this step.
Step 8: Prep Your Nails for Polish
Before you apply your nail polish, make sure to clean your nails with a cotton ball soaked in nail polish remover. This will remove any excess oils or lotions that could prevent the polish from adhering properly. Your nails should be clean, dry, and ready for polish.
Step 9: Apply Nail Polish
Now it's time for the fun part – applying your nail polish. Start with a base coat to protect your nails and help the polish adhere better. Once the base coat is dry, apply two thin coats of your chosen nail polish color, allowing each coat to dry completely before applying the next. Finish with a top coat to seal in the color and add shine.
Pro Tip:
For a professional finish, start in the middle of your nail and then paint each side. Be sure to cap the tip of your nail to help prevent chipping.
Step 10: Relax and Let Your Pedicure Dry
After you've applied your nail polish, it's important to let it dry completely to avoid smudging or smearing. Take this time to relax and enjoy your freshly pampered feet. You can read a book, watch a movie, or do a quick meditation while you wait for your pedicure to dry completely.
Step 11: Clean Up Any Mistakes
If you've accidentally gotten nail polish on your skin or cuticles, don't worry. Simply dip a cotton swab into nail polish remover and carefully clean up any mistakes. This will give your pedicure a clean and professional look.
Step 12: Show Off Your Beautiful Pedicure
Once your pedicure is completely dry and you've cleaned up any mistakes, it's time to show off your beautiful toes! Put on your favorite sandals or open-toed shoes and flaunt your professionally done pedicure with confidence.
By following these step-by-step instructions, you can give yourself a professional pedicure at home that looks just as good as one you'd get at a salon. Not only will you save money, but you'll also enjoy the relaxing and pampering experience of treating yourself to a DIY pedicure. So grab your supplies, set aside some time for yourself, and get ready to give your feet the TLC they deserve!